Platform Overview
Understand what MyDose.ai does and how your clinic runs on it day to day.
MyDose.ai is a practice management platform built for clinics offering longevity therapy. It connects your clinical team with patients through a single system that handles patient onboarding, treatment planning, consultations, pharmacy fulfillment, and adherence tracking.
Where to find it
Sign in at app.mydose.ai. Your team manages everything from the clinic Dashboard; patients interact through their own portal to review treatment plans, log doses, and message your team.
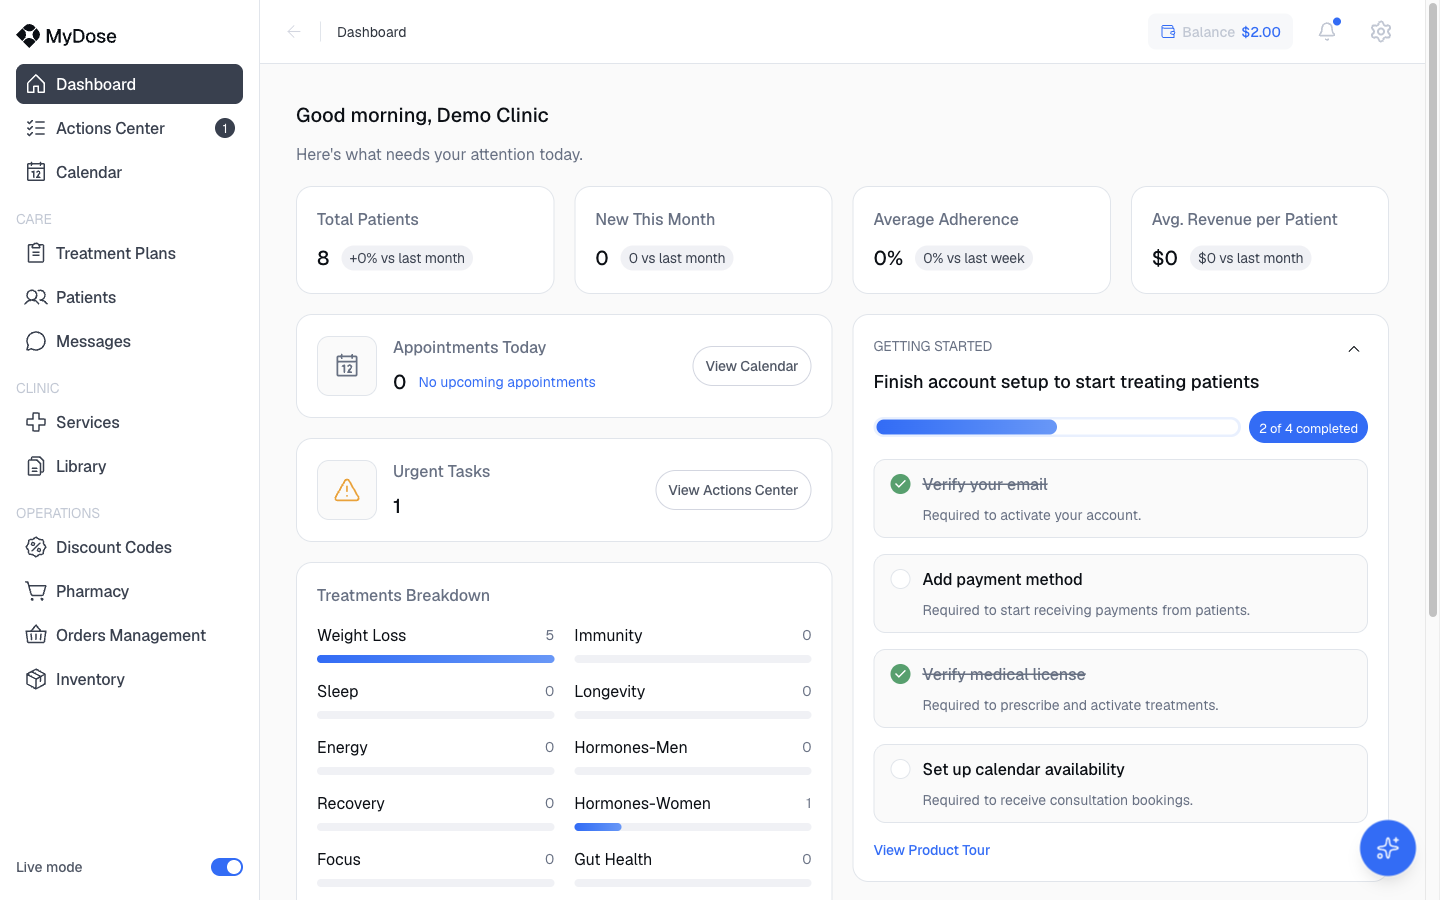
The sidebar puts Dashboard, Actions Center, and Calendar at the top, then groups the rest into CARE (Treatment Plans, Patients, Messages), CLINIC (Services, Library), and OPERATIONS (Discount Codes, Pharmacy, Orders Management, Inventory). See Navigating the portal for a full tour.
Use the Live mode / Demo mode toggle at the bottom of the sidebar to explore safely with sample data. Changes made in Demo mode are not saved.
What your team can do
- Manage patients — add patients, invite them to the patient portal, and filter your roster from Patients.
- Build and assign treatment plans — create plans or assign packages from Treatment Plans.
- Schedule and run consultations — manage bookings and availability from Calendar.
- Prescribe and track treatments — prescribers approve intakes and treatments; average adherence shows on the Dashboard.
- Order through the pharmacy — handle fulfillment from Pharmacy, Orders Management, and Inventory.
- Monitor progress and tasks — Dashboard stat cards and treatments breakdown, plus urgent tasks in the Actions Center.
- Message patients — from Messages in the CARE group.
How the core loop works
Most day-to-day work follows one loop:
Start by adding a patient, then assign a package or create a treatment plan. Once the patient completes their intake, review and approve it to activate treatment.
Finish account setup
New accounts see a GETTING STARTED card on the Dashboard — "Finish account setup to start treating patients" — with four required items:
Verify your email
Required to activate your account.
Add payment method
Required to start receiving payments from patients.
Verify medical license
Required to prescribe and activate treatments.
Set up calendar availability
Required to receive consultation bookings.
The Viva setup assistant (the blue sparkles button in the bottom-right) walks you through these steps and resumes at your first incomplete one. See Clinic setup for the full walkthrough.
How roles work
| Role | Default access |
|---|---|
| Owner | Full access to everything, including admin settings and team management. |
| Doctor | All prescriber permissions by default — prescribe, adjust and approve treatments, approve intakes, order labs. Can be narrowed per member. |
| Staff | Schedule and cancel appointments, add and manage patients, order bloodwork. No prescribing or approvals by default. |
Permissions are configured in Settings → User Management — see Team management and Roles & permissions for details.
Whitelabel clinic accounts see a reduced portal: clinical items in the sidebar are disabled.
Key terms
| Term | Meaning |
|---|---|
| Services | The offerings your clinic makes available to patients, managed from Services in the sidebar. |
| Treatment Plan | The set of treatments a patient is assigned — created by your team and approved by a prescriber before it becomes active. |
| Intake | The medical questionnaire a patient completes before a prescriber can approve their treatment. |
| Consultation Type | A bookable appointment format patients can schedule against your calendar availability. |